Signed in as:
filler@godaddy.com
Signed in as:
filler@godaddy.com
DWX-51D ATTACHING A TOOL
DWX-51D Spindle Unit Replacement R1
DWX-51D Correction of Milling Machine R2
DWX-51D Cleaning after Milling Finishes R2

If you are not familiar with the Roland Dental Milling Machines, the VPanel (Virtual Machine Panel) is a control panel that allows the users to automatically run milling calculations, perform diagnostics, and even calibrate the mill.

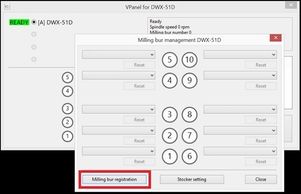
The bur management application is located on the VPanel and is highlighted in red below. The Roland DWX-51D has a total of 10 bur slots available allowing the user to seamlessly switch between materials without swapping burs. With the milling bur management application open, we need to register the burs that you are using. Please select "Milling bur registration" on the bottom of the bur management application.

Within the bur registration page, you will notice that there are already tools registered. These are Roland generic tools, and will need to be removed to avoid confusion. To register new tools, go ahead and select the "add milling bur" button; fill out the milling bur information, and then select save.

The lifespan of the cutting burs are all dependent on type of cutting bur (diamond or gold) and brand of material that you are using. The best way to calculate bur life is by setting the tool at the maximum hours, and then recording the hours when there is noticeable defects to the surface quality. For Example, if I am milling zirconia and I notice that my margins are chipping at a bur life of 91 hours and 32 minutes, I would then set my bur lifespan at 90 hours. After all of the burs are registered for the materials that are being milled, go ahead and close out of bur registration.

With the Whip Mix Milling Strategy, the bur slots are material specific. Zirconia cutting burs are in slots #5 (2mm) and #4 (1mm). Wax cutting burs are in slots #3 (2mm) and #2 (1mm). PMMA/Peek cutting burs are in slots #8 (2mm) and #7 (1mm). The #1 and #6 slots are used on all materials, offering the higher detailed burs at .3mm (slot #1) and .6mm (slot #6). Slot #10 is used for holding the detection pin for calibration and the #9 slot is left blank.

By following the order above you can successfully place the correct burs into the correct bur timeclock. When finished, go ahead and select close and the VPanel will now record your bur life, helping you predict when you will need replacements !

Unscrew 6 screws of the outer box.

Once you open the outer box, unsrew black screws on the front.

Unscrew 3 screes of the side.

By turning the showing screws, lose the tension of the belt.

And take out the spindle.
Sign up to hear from us about specials, sales, and events.
Copyright © 2016 Labtos - All Rights Reserved.
Powered by LABTOS
This website uses cookies. By continuing to use this site, you accept our use of cookies.